Chapters (22)
- Chapter One
- Chapter Two
- Chapter Three
- Chapter Four
- Chapter Five
- Chapter Six
- Chapter Seven
- Chapter Eight
- Chapter Nine
- Chapter Ten
- Chapter Eleven
- Chapter Twelve
- Chapter Thirteen
- Chapter Fourteen
- Chapter Fifteen
- Chapter Sixteen
- Chapter Seventeen
- Epilogue
- Cinnamon Swirl Bread
- Stars and Stripes
- About the Author
- Turn the page for a sneak peek of
Designed by Kelly Harvey and Patty Gallmeyer, this quilt was chosen for the cover of Quilts of Valor: A Fifty State Salute (Schiffer, 2018). The book, written by Sue Reich, Renelda Peldunas-Harter, and Ann Parsons Holte, tells the story of the Quilts of Valor Foundation, gives a history of quilts that were made in response to war, documents the story of the makers and recipients of quilts pictured in the book, and features patterns for sixteen of those quilts. The Foundation is pleased to make this pattern available for quilters who want to participate in this important project to comfort those touched by war.
This pattern was adapted with quilt groups in mind. Often, volunteer quilters get together to make Quilts of Valor. As with any group project, things go more smoothly if the process is broken down into logical steps so that the parts can come together in the end. We hope that your group will enjoy making a quilt to thank a veteran for his or her service.
Fabric Requirements:
This quilt can be made from only three fabrics: red, white, and blue. However, assorted prints create an interesting, scrappy look. Note that these instructions are for 100% cotton, first quality, quilting weight fabric that is at least 40” wide. You will need approximately:
For Blocks: 2-1/4 yds White, 1-3/4 yds Blue, 1-3/8 yds Red
For Borders: 3/4 yd Blue, 3/4 yd Red
For Backing: 4-1/2 yds
For Binding: 3/4 yd
Cutting and Organizing the Fabric:
There are three elements to the main quilt top:
- red+white stripes
- blue+white 9” Morning Star blocks, and
- red+white+blue 9” Split Star blocks
Whether you are sewing alone or with a group, a good idea is to make labels before you cut the fabric.
Label Fabric Cutting Instructions
Borders
Left/Bottom Borders Red (2) 4-1/2” x WOF*
Top/Right Borders Blue (2) 4-1/2” x WOF
Stripes
Red Stripes Red (11) 2-3/4” x WOF
White Stripes White (11) 2-3/4” x WOF
Morning Star Blocks
Star Center Squares White (21) 3-1/2” squares
Star Points White (168) 2” squares
Star Corner Squares Blue (84) 3-1/2” squares
Star Background Blue (84) 31/2” squares
Split Star Blocks
Corner Square White (7) 3-1/2” squares
HST/QST Squares* White (25) 5” squares
HST Center Squares Blue (11) 5” squares
Corner Squares Red (7) 3-1/2” squares
HST/QST Squares* Red (14) 5” squares
*Note:
- “WOF” means Width of Fabric.
- “HST” means Half-Square Triangle.
- “QST” means Quarter Square Triangle.
These squares will be cut larger than needed and then will
be trimmed to the correct size after the units are sewn.
Label and Assemble Red+White Stripe Units
If you are working in a group, this page is for the people who will work on the Stripe Units.
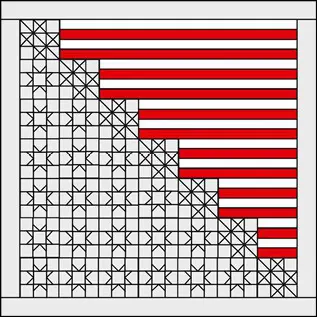
Make labels that say:
- 9-1/2” Segment
- 18-1/2” Segment
- 27-1/2” Segment
- 36-1/2” Segment
- 45-1/2” Segment
- 54-1/2” Segment
Cutting:
- You have already cut (11) 2-3/4” x WOF assorted red strips and (11) 2-3/4” x WOF assorted white strips
- Cut these strips into various lengths from 9” to 12” long
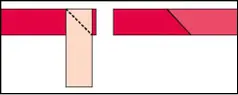
Make Strip Sets:
- Attach short, scrappy red segments together with diagonal seams to make approx. 400” long strip